Proper dental chair positioning plays a key part in today’s dental practices. It boosts ergonomics for the team, keeps patients comfortable, and streamlines treatments. Think about it. When everything aligns just right, procedures flow smoother, reducing stress for everyone involved.
Positioning errors sneak in more often than expected. Clinics get busy, and small oversights like poor alignment or uneven weight distribution add up. Operators might slouch without noticing, or forget about posture during long days. It’s surprising how these slip-ups affect daily work.
This guide aims to spotlight common pitfalls in dental chair setup. It offers tips to sidestep errors that risk safety or shorten equipment life. At Gladent, small tweaks in chair design and positioning have shown big gains in workflow and patient comfort.
Bad alignment between the dentist’s posture and patient position causes real trouble. Fatigue sets in quick. Back pain flares up. Precision drops during delicate work. Patients sense the tension too, making sessions less pleasant.
One frequent slip is setting the chair too low for upper molar tasks. Or too high for anterior procedures. This forces awkward reaches. Strain builds on shoulders and neck. Over time, it wears down the operator’s focus.
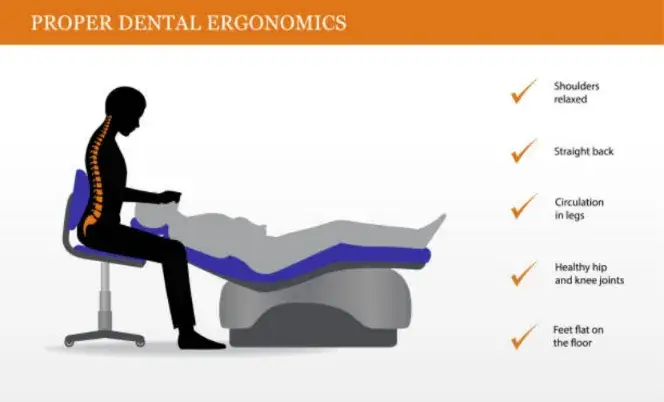
Stick to the “elbows at 90 degrees” rule. Adjust chair height based on the procedure. For crowns, go a bit higher. Cleanings might need lower settings. Test it out before starting. Simple checks prevent big issues.
Keep hips higher than knees for better blood flow.
Position the patient’s head at eye level.
Use lumbar support to maintain natural spine curves.
Modern dental chairs typically handle 135 to 200 kg. But always double-check the manufacturer’s specs. Variations exist based on model and build. Overlooking this invites problems down the line.
Pushing beyond the limit stresses key parts. Actuators might fail. Hydraulic systems could leak. Base plates weaken over repeated strain. Safety drops, and repairs eat into clinic time and budget.
Verify the dental chair weight limit before seating heavier patients. Opt for smooth, balanced recline motions. Distribute weight evenly during adjustments. High-quality dental chairs from Gladent include reinforced lifting systems and smart weight sensors to prevent overload-related issues.
Weigh patients discreetly if needed.
Train staff on limit awareness.
Choose chairs with clear load indicators.
Sometimes clinics skip this step in a rush. But a quick glance at the manual saves headaches later.

Wrong angles mess with patient airways. Discomfort spikes. Breathing gets restricted in extreme tilts. This turns a routine visit into an ordeal. Operators notice resistance, slowing the whole process.
Different procedures demand specific tilts. Scaling calls for slight upright positions. Surgery often needs more recline. Impression taking works best with neutral angles to avoid gagging. Get it wrong, and accuracy suffers.
For extractions: 45-degree backrest for clear access.
Root canals: Headrest tilted back 10-15 degrees.
Check-ups: Keep it comfortable, around 20 degrees.
Rely on adjustable headrests. Recline slowly to match spinal alignment. Monitor patient feedback during setup. Fine-tune as needed. This keeps things smooth and safe.
It’s easy to overlook in a packed schedule, yet patients appreciate the extra care.
Foot pedals end up too far away. Side instruments crowd the patient space. These setups happen when chairs aren’t configured for the room layout. Clutter builds, and efficiency tanks.
Strain hits the operator hard. Accidental bumps trigger unwanted chair moves. Focus breaks during critical moments. Patients feel the jostling, adding to unease.
Neck craning to reach controls.
Arm fatigue from poor support.
Increased error risk in procedures.
Test reach to every control before patients arrive. Adjust arm supports for stability. Clear pathways around the chair. Regular drills help staff spot issues early.
Busy practices sometimes push this aside, but a few minutes upfront pays off.
Hydraulic drift signals trouble. Loose joints wobble during use. Uneven tilts throw off balance. These signs pop up from daily wear, especially in high-volume clinics.
Schedule calibrations every 6 to 12 months. Catch problems before they escalate. Replace worn parts promptly. This maintains accurate positioning and extends chair life. Partnering with a reliable manufacturer like Gladent ensures long-term performance and maintenance support for your dental chairs.
Inspect hydraulics quarterly.
Lubricate joints as per guidelines.
Monitor for unusual noises.
Overlooking maintenance might seem minor, but it leads to downtime nobody wants.
Mastering dental chair positioning boosts safety and comfort. It prolongs equipment life too. Avoid these top mistakes for better outcomes.
Always factor in weight limits and ergonomic setups. Check before each treatment. Small habits make a difference.
If upgrading or maintaining clinic equipment, explore Gladent’s ergonomic dental chair solutions designed for precision and comfort.
Setting the chair too high or too low, forcing elbows away from the ideal 90-degree angle. This leads to shoulder and back strain within minutes.
Check the manufacturer’s label on the base or the user manual. Most modern chairs handle 135–200 kg, but never guess; look it up every time.
Yes. Too steep restricts breathing; too flat makes patients slide. A 10–20° tilt usually works best for most procedures.
Every 6–12 months, or sooner in high-volume clinics. Watch for drift, wobbles, or slow movement; those are red flags.
Absolutely. If the pedal is out of reach, operators stretch or twist, causing accidental movements and fatigue by mid-afternoon. Test reach before every session.
 No. 1, No. 2, Fenggang Industrial Zone, Lianhe, Luocun, Shishan Town, Nanhai District, Foshan City, China
 Call us now:+86-757-81267151